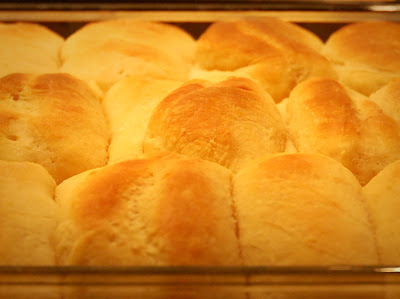
A Phillips family favorite. My Grandma Lucy made wonderful rolls that made Thanksgiving complete. When I was a kid the Phillips family would meet at Grandma's house for Thanksgiving and Christmas Eve. To keep up busy (and out of trouble) Grandma would give us kids the scraps of this dough to play with at the counter (in sight but out of the way). If we wanted we could for the dough into festive shapes (snowmen and reindeer etc.) and then she would put them in pans and bake them for us. I thought this was great!
This past holiday season my uncle Merritt shared his recipe the Grandma's Rolls on facebook. It didn't take long until other members of the family noticed that his recipe that he had gotten form Lucy was different than other Grandma's Rolls recipes (all from Lucy). Some year we will need to do a rolls bake-off to find the winner but until then I will share with you the recipe for Grandma's Rolls (the real recipe of course!). I am bias toward this recipe because 1) it is the only one I have used and 2) my mother wrote the recipe while watching Grandma make rolls so I trust it knowing that, in fact, she did make rolls this way-- at least once.
This past holiday season my uncle Merritt shared his recipe the Grandma's Rolls on facebook. It didn't take long until other members of the family noticed that his recipe that he had gotten form Lucy was different than other Grandma's Rolls recipes (all from Lucy). Some year we will need to do a rolls bake-off to find the winner but until then I will share with you the recipe for Grandma's Rolls (the real recipe of course!). I am bias toward this recipe because 1) it is the only one I have used and 2) my mother wrote the recipe while watching Grandma make rolls so I trust it knowing that, in fact, she did make rolls this way-- at least once.
Another way I know they are the best rolls ever... I'm eating one right now.
Here is a half recipe (for when you don't have a dozen people to feed) Now it's a little involved but it's worth it!
Grandma's Rolls via Kristen
yields one full 9x13 pan of dinner rolls and a pan of cinnamon rolls (also tradition) but it varies based on how thick you roll the the dough etc.
You will need 1/2 Cup Mashed Potatoes (no lumps)if you don't already have some you'll want to start that first.
pour 1 can Evaporated Milk in a large liquid measuring cup, then add regular milk until you have 2 1/4 Cups --- then in a saucepan scald the milk and let it cool until it is now longer hot, but still warm.
Proof the yeast by dissolving 2 Tbs. Yeast into 1/4 Cup Warm Water and 1/2 Tbs. Sugar
While the yeast gets puffy,
Ideally in a large mixer (Grandma had a Bosch, I have a KitchenAid)
Beat 3 Eggs and combine with 1/2 Cup + 1/3 Cup Vegetable or Canola Oil
Add the mashed potatoes and the now just warm scalded milk and the puffy yeast
Once those are incorporated
Add 3/4 Cups Sugar and 1/2 Tbs. Salt
Slowly we add the Flour (6-8 Cups of it) 1/2 cup at a time allowing the flour to mix in between. You want to be careful not to add more flour than is necessary to keep the lightness of the rolls we are looking for. I try to add just enough flour so the dough is no longer shiny. It will still be a bit sticky but will not stick to the side of the bowl.
Dab the top of the dough with a small amount of oil, cover with plastic wrap or towel and let rise until about double (about half and hour in a nice warm spot but it can take longer).
When the dough is about ready you want to prep the space that you will form the rolls. Liberally apply flour to a clean smooth surface (a counter top or a very large cutting board). Melt a stick of butter and brush the bottom and sides of the pans you will be using (I like to have a butter assistant).
With flour on your hands pull off a portion of dough and roll approximately 3/8-1/2" thick with a rolling pin or a cylindrical drinking glass. With a biscuit cutter or the opening of of a drinking glass cut out as many circles that you can (my uncle Merritt cuts them into squares... he's very efficient, but I have not tried it that way). Dip the bottom half of the circle of dough in the melted butter and place in the pan buttered side down and fold the unbuttered half on top (I just brush butter between the layers as I fold them over). Transfer the unused dough from counter top to a plate to wait. Repeat until you have filled the pan with rolls. Brush the tops with butter and cover to let rise until they are the size you want your dinner rolls to be (it's disappointing if your in a hurry and put them in too soon hoping they'll rise a little more while they're in the oven).
If you only want dinner rolls just keep going until you run out of dough (you can re-roll the scrap dough). Since the scrap dough will have slightly more flour incorporated I like to use it for cinnamon rolls. To do so I roll out a large rectangle of dough as thin as I am comfortably able. The thinner the dough the more layers in the finished roll and the less space between sweet cinnamonny goodness.
Then slather it with melted butter, it helps the goodies stick. There are a few ways it can go from here. I typically apply a cinnamon and sugar mixture (fresh cinnamon is best)-- enough to soak up the butter but not dry-- and crumble on some brown sugar. If you want you can add raisins and/or chopped walnuts/pecans etc.
Before you roll it up decide whether you want a smaller number of large cinnamon rolls or if you want a larger number of smaller rolls-- that will determine which way you roll up your rectangle of dough. (starting with the long side for small rolls or starting with the short side for larger rolls... it's all in the number of revolutions) When you roll it up you want to keep it snug and even forming a log shape. To get a few more rolls out of it I sometimes roll the log back and forth to stretch it out a little more.
(you could toss this baby into a buttered loaf pan to get very tasty bread with a cinnamon sugar swirl-- my sister has done this-- when she used to eat gluten-- she liked it)
For rolls you take about 12" of sturdy thread and slide it under the log about an inch from the end. Bring the ends of the thread upward and around the log so they align on the top. Now pull the ends of the thread to slice a disc off the end. Place the disc swirly side up in a buttered pan. Repeat the thread action until you're out of dough. The first and last disc turn out a little wonky but no body cares. When the pan is full pat the tops with melted butter and sprinkle on some more of the cinnamon/sugar mixture. Cover. put in a warm place and let rise.
With your oven rack in the middle position, preheat your oven to 400 degrees while the rolls are rising and when they are about doubled in size bake for 15-20 minutes (but start checking them around 10 minutes just in case, you don't want to go though all this and then burn them... that's really no fun).
The cinnamon rolls in the back had not been baked yet and needed to rise a bit more. Turkeys are still 99 cents per pound around here so we're having a mini Thanksgiving this week-- yay for cooking a lot one day to feed us for a week. It's weird to cook a turkey and not have company over... but I guess it's weird to cook a turkey for a Monday night.
Oh, and you can freeze the dough too! So far I've had it work best to freeze it just before the first rise, thaw it in the fridge overnight then shape into rolls, rise, bake, yum!
Oh, and you can freeze the dough too! So far I've had it work best to freeze it just before the first rise, thaw it in the fridge overnight then shape into rolls, rise, bake, yum!









No comments:
Post a Comment