Wednesday, May 4, 2011

Don't Mess With My Meds!

I should have been for protective, but I didn't know what would happen.  My doctor had me do some blood work to check my thyroid levels.  The nurse practioner called to tell me that my levels where on the high side (which is what the blood work said) and that she would like to prescribe a slightly lower dose of my hormone replacement.  

"Sure" I said... like an idiot.

For each of my thyroid scans I had to go off my replacements completely and during that process I felt mostly fine so my reasoning lead me to believe that just a mere decrease of a mere 25 mg would be hardly perceivable.


Wrong.  Very Wrong.

Now it wasn't all that bad.  The thing about these hormone replacements is that they are long acting.  A change in dose takes a whole six weeks to take full effect.  This can be a very good thing, say, if I forget to take my pill one day it won't make me crash-- that's a very good thing.  But about three weeks after taking the new slightly lower dose I started to drag and it took me a few days to realize why.  But I would have to wait another three weeks before my next round of blood work to show that this was bad and that it needed to be fixed, which I did.

This was a new experience for me.  I've felt tired before, but not like this.  I've been lazy before, yet this was different.  Tired, but not sleepy, and sleep didn't make me less tired.  I faked it, I did what I needed to do and even some things that I just wanted to do when I was coasting on the fake mustered energy.  That actually helped a little, it felt good to get some things done but I would pay for it later in extra tiredness.  I made it a point to get up and still do things.  I know sometimes acting tired or lazy can cause additional tiredness or laziness.  It's an odd sensation to just 'run out of gas' especially when I wasn't trying to do anything extraordinary or physically demanding.  After a while it just got frustrating.  Immensely frustrating.

It was finally time to do blood work again.  The next day I started taking my old pills because at that point I didn't care what the results would say, I concluded the experiment was a failure.  Typically the nurse practitioner calls me the day after I receive my copy of the lab results to make further adjustments.  When no call came that week I made an appointment.  

During the appointment she said that my numbers looked fine and I'm grateful that when I told her that the new dose wasn't working for me and that I felt normal with my old dose she agreed to write a new prescription for my old dose.  Funny, I was half-expecting her to say 'well you're numbers say you're fine' and leave it at that-- not because of my interactions with her in the past but just because I know that medical professionals can do that sometimes.  I was prepared to get defensive... I'm glad that was not necessary... I didn't want to hurt her.

About three weeks after that (long acting is also code for slow acting) I started to feel a slight improvement.  I'm now feeling pretty normal and getting back into the usual swing of things.

yay!

Wednesday, February 23, 2011

Fire Starters

Emergency preparedness is a great thing.  There's more I need to do to feel adequately prepared-- but I did make some fire starters.  Some of these were part of a Christmas gift for my brother-in-law (yeah, he's kind of hard to shop for) but having the deadline helped me get it done.  I'm finally getting around to posting about it.  It was a fun experience I would like to share.

First off, fire starters are great to have in your emergency/camping kit.  They function to decrease or eliminate the amount of kindling you need to build a fire because in less-than-ideal situations nice dry kindling can be hard to come across in quantity.  So these little guys are easy to light and help get any larger pieces of wood ablazin'.  But if you go shopping for them online you will find that they can get a bit pricey... especially for a great number of them.

There are several ways to make your own for a lot less.  I made just two kinds (both found in my Cub Scout Leader How-To Book-- handy).  The first is essentially coiled strips of corrugated cardboard with a cotton twine wick nestled inside a shallow can then filled (or mostly filled) with melted wax-- it's called a "buddy burner" in the scout book.


See the wax?  This is an 11 pound block I bought at Micheals.  There might be cheaper places to get large amounts of wax but with a 50% off coupon it wasn't too painful and  not bad considering that the rest of the materials are either found or re-purposed.

Next I called up someone I knew who loves her cats.  You probably already know a person like this.  She has many cats and loves them so much she goes through several small cans of cat food a day (these are also the softest cats I've ever met! seriously).  I asked her to save some for me which she did gladly, she even cleaned them out for me!  So yay for free!


Here is one with the cardboard coiled inside.  I first did a test strip to figure out wide and long each strip needed to be.  These were 1 1/4" wide and 29" in length but it can be several strips to add up to 29" not just one long piece.  It's not hard to find a beat up cardboard box and I cut them with my rotary cutter which made the operation fast and easy.  The wicks are cotton twine (used our used garden twine) with a knot at the bottom to help it not slip out.


I then broke up the big block of wax and melted pieces in a double boiler.  Now you don't want to use your food pots for this.  I have a pot that I have designated for non-food use (dying small pieces of fabric, shaping thermoplastic etc.) that I boiled the water in and used a large can in which I melted the wax and then poured into the prepared cat food cans.  In the future I would use another coupon and just get the metal pitcher designed for making candles-- I suspect it wouldn't dribble as much as the big tomato juice can, that was a problem.

The second type of fire starter (also found in the cub scout book) I made with cardboard egg carton flats, filled with sawdust and then filled with melted wax.  *tip* keep the plastic top that comes with the eggs and place it under the carton part so they nest together to catch any wax that may seep through the cardboard (when it cools it can be chipped out and melted down again).


So this is how many fire starters 11 pounds of wax makes... okay maybe more like 10.8 pounds-- I had a little left over and spilled some on my floor (so if you're ever in my kitchen watch out for the slick spots).  51 buddy burners and 60 egg cup starters.  Not bad.

Okay so I made fire starters to help be prepared for an emergency or even just to go camping or backpacking.  It would be plain irresponsible to neglect to test them!  hee hee!  For some reason I had it in my head that the book said the tuna can sized buddy burner would burn for about 40 minutes.  As I check the book now it says no such thing... curious.  But at the time that was what I was expecting.  This is what a timed trial showed:


So while I did get chilly (I was in Sacramento at the time so it wasn't as bad as it would have been in Michigan) I was pleasantly surprised how long and how strong the flame was from the buddy burner.  Three of them together could form a small campfire. The egg cup starter went up really quickly which can be nice if your fire only need a little help and is pretty dry.  

Of course a starter such as these would be useless if you don't have a way to ignite them.  For that we have strike anywhere matches made water resistant by painting them with clear nail polish stored in a waterproof container with a strip of sand paper (although Dennis can light them with his thumb-- more cool than the dudes that crush aluminum cans on their foreheads for sure).  We also have flint and steel with a ziplock bag of dryer lint as well as a few water resistant lighters.

So figuring that each buddy burner lasts an average of 1:05 and each egg cup starter lasts 9 minutes then the total fire time form this batch of starters would be about 64 hours and 15 minutes.  sweet!

Tuesday, February 1, 2011

Too Bad... ... So Sad

.


Oh Drat!  I'm a little sad to have this glass break.  We received a set of eight of these adorable glasses (each one is different) as a wedding gift from my mother-in-law's neighbor who had them wrapped up for decades.  I don't know how old they are but I like them quite a lot.  I understand why people never use their favorite things, in order to preserve and protect those things, but in another way it is also sad to have favorite things that never see the light of day.  All in all they are just things and it makes me happy to use them... and I do try to be careful with them.  Oh well... no more blue bells.

Our set of eight is now a set of six.  This one broke while I was washing it and the first one was bitten to death by a child a couple of Thanksgivings ago (thankfully the child was not injured).  I had misgiving about a youngster using one of the glasses I like so well, true, but I did not want to offend the parents, and the child did seem to be very mellow.  It wasn't done on purpose... and I have never heard of such a thing so I didn't think to ask if they were a biter.  Everyone was surprised by that one.

Friday, January 28, 2011

Grandma's Rolls

A Phillips family favorite.  My Grandma Lucy made wonderful rolls that made Thanksgiving complete.  When I was a kid the Phillips family would meet at Grandma's house for Thanksgiving and Christmas Eve.  To keep up busy (and out of trouble) Grandma would give us kids the scraps of this dough to play with at the counter (in sight but out of the way).  If we wanted we could for the dough into festive shapes (snowmen and reindeer etc.) and then she would put them in pans and bake them for us.  I thought this was great!

This past holiday season my uncle Merritt shared his recipe the Grandma's Rolls on facebook.  It didn't take long until other members of the family noticed that his recipe that he had gotten form Lucy was different than other Grandma's Rolls recipes (all from Lucy).  Some year we will need to do a rolls bake-off to find the winner but until then I will share with you the recipe for Grandma's Rolls (the real recipe of course!).  I  am bias toward this recipe because 1) it is the only one I have used and 2) my mother wrote the recipe while watching Grandma make rolls so I trust it knowing that, in fact, she did make rolls this way-- at least once.

Another way I know they are the best rolls ever... I'm eating one right now. 


Here is a half recipe (for when you don't have a dozen people to feed)  Now it's a little involved but it's worth it!

Grandma's Rolls via Kristen
yields one full 9x13 pan of dinner rolls and a pan of cinnamon rolls (also tradition) but it varies based on how thick you roll the the dough etc.

You will need 1/2 Cup Mashed Potatoes (no lumps)if you don't already have some you'll want to start that first.

pour 1 can Evaporated Milk in a large liquid measuring cup, then add regular milk until you have 2 1/4 Cups --- then in a saucepan scald the milk and let it cool until it is now longer hot, but still warm.

Proof the yeast by dissolving 2 Tbs. Yeast into 1/4 Cup Warm Water and 1/2 Tbs. Sugar
While the yeast gets puffy,
Ideally in a large mixer (Grandma had a Bosch, I have a KitchenAid)
Beat 3 Eggs and combine with 1/2 Cup + 1/3 Cup Vegetable or Canola Oil

Add the mashed potatoes and the now just warm scalded milk and the puffy yeast
Once those are incorporated
Add 3/4 Cups Sugar and 1/2 Tbs. Salt
Slowly we add the Flour (6-8 Cups of it) 1/2 cup at a time allowing the flour to mix in between.  You want to be careful not to add more flour than is necessary to keep the lightness of the rolls we are looking for.  I try to add just enough flour so the dough is no longer shiny.  It will still be a bit sticky but will not stick to the side of the bowl.

Dab the top of the dough with a small amount of oil, cover with plastic wrap or towel and let rise until about double (about half and hour in a nice warm spot but it can take longer). 

When the dough is about ready you want to prep the space that you will form the rolls.  Liberally apply flour to a clean smooth surface (a counter top or a very large cutting board).  Melt a stick of butter and brush the bottom and sides of the pans you will be using (I like to have a butter assistant).

With flour on your hands pull off a portion of dough and roll approximately 3/8-1/2" thick with a rolling pin or a cylindrical drinking glass. With a biscuit cutter or the opening of of a drinking glass cut out as many circles that you can (my uncle Merritt cuts them into squares... he's very efficient, but I have not tried it that way).  Dip the bottom half of the circle of dough in the melted butter and place in the pan buttered side down and fold the unbuttered half on top (I just brush butter between the layers as I fold them over).  Transfer the unused dough from counter top to a plate to wait.  Repeat until you have filled the pan with rolls.  Brush the tops with butter and cover to let rise until they are the size you want your dinner rolls to be (it's disappointing if your in a hurry and put them in too soon hoping they'll rise a little more while they're in the oven).

If you only want dinner rolls just keep going until you run out of dough (you can re-roll the scrap dough).  Since the scrap dough will have slightly more flour incorporated I like to use it for cinnamon rolls.  To do so I roll out a large rectangle of dough as thin as I am comfortably able.  The thinner the dough the more layers in the finished roll and the less space between sweet cinnamonny goodness.

Then slather it with melted butter, it helps the goodies stick.  There are a few ways it can go from here.  I typically apply a cinnamon and sugar mixture (fresh cinnamon is best)-- enough to soak up the butter but not dry-- and crumble on some brown sugar.  If you want you can add raisins and/or chopped walnuts/pecans etc.

Before you roll it up decide whether you want a smaller number of large cinnamon rolls or if you want a larger number of smaller rolls-- that will determine which way you roll up your rectangle of dough.  (starting with the long side for small rolls or starting with the short side for larger rolls... it's all in the number of revolutions)  When you roll it up you want to keep it snug and even forming a log shape.  To get a few more rolls out of it I sometimes roll the log back and forth to stretch it out a little more.

(you could toss this baby into a buttered loaf pan to get very tasty bread with a cinnamon sugar swirl-- my sister has done this-- when she used to eat gluten-- she liked it)

For rolls you take about 12" of sturdy thread and slide it under the log about an inch from the end.  Bring the ends of the thread upward and around the log so they align on the top.  Now pull the ends of the thread to slice a disc off the end.  Place the disc swirly side up in a buttered pan.  Repeat the thread action until you're out of dough.  The first and last disc turn out a little wonky but no body cares.  When the pan is full pat the tops with melted butter and sprinkle on some more of the cinnamon/sugar mixture.  Cover. put in a warm place and let rise.

With your oven rack in the middle position, preheat your oven to 400 degrees while the rolls are rising and when they are about doubled in size bake for 15-20 minutes (but start checking them around 10 minutes just in case, you don't want to go though all this and then burn them... that's really no fun).


The cinnamon rolls in the back had not been baked yet and needed to rise a bit more.  Turkeys are still 99 cents per pound around here so we're having a mini Thanksgiving this week-- yay for cooking a lot one day to feed us for a week.  It's weird to cook a turkey and not have company over... but I guess it's weird to cook a turkey for a Monday night.

Oh, and you can freeze the dough too!  So far I've had it work best to freeze it just before the first rise, thaw it in the fridge overnight then shape into rolls, rise, bake, yum!

Wednesday, January 26, 2011

Fun with Contact Paper

.
When the weather is not very friendly outside it's good to have some things to do inside. In elementary school it was called a "rainy day schedule" meaning that we couldn't go outside to play which we were always bummed about but that we could play board games and the like in our classroom. While this wasn't exactly appealing I was often surprised how it ended up being quite fun and how we still didn't want recess (in any form) to end.

Now that I'm big I have several options of things to keep me busy when doing much of anything outside would not be great fun. I had been thinking about it for quite a while so it was fun to take a morning and do it.


I decorated my living room wall with stylized dandelion fluff. I cut the shapes out of white contact paper (shelf/drawer liner) then applied them to the wall making sure that a few of the seeds were visible through the floating frames that hold a couple of our wedding pictures.

Using contact paper to make wall decals is a very affordable DIY alternative to vinyl transfers. It was it's drawbacks, for instance it's harder to evenly space letters if your putting up words although it can still be done, I feel the MUCH lower price of the contact paper outweighs any hassles.


And of course because no decorating post would be complete without a dreary before picture complete with bad lighting-- like the infomercials that make the most ordinary tasks (like washing your car) back breaking work. Oh, the jars of tomato sauce on the dining room table were being used as paperweights to hold the contact paper nice and flat.


Here is a close up of one of the seeds. The toys in front is part of the collection of toys we found while working in the garden.

I made a stencil to make things go faster and so each one would be roughly the same size and shape. I flipped the stencil over so the stems weren't all curving the same direction because that would look weird.

So as I'm just about finished sticking them to the wall I'm pretty jazzed and I call my sister to share my jazz-ed-ness. She likes to do projects and I knew she could relate to how I was feeling with almost being done and happy with the results. "That's been around for, like, two years" wasn't the response I was expecting. So yeah, while the idea is not entirely new, mine look different, I like them, they make me happy, I did it in one morning and it cost me 50 cents in materials.

Saturday, January 8, 2011

Nina Pinckard Fechtner

.


I'm still in shock. Today I learned that my friend Nina passed away. It doesn't feel real. I've work with her for every summer for over ten years. Nina worked at the CSUS doing everything for the costume shop. She's amazing. The first thing I learned from Nina was about circular cuffs and the last thing I learned was about fabric flowers... and there is a lot in between.

She was smart and concise with a great attention to detail. Last summer at the Fair she made the overalls for the farmer on the ladder in one of the small window displays (she did most of the figurine costumes) and made tiny clasps on the overall straps and was a little bummed that the size of the brads that she used for the buttons to a bit to large to allow the clasp to actually function as a real one would.


It seems a little wrong that out of the vast vastness of Nina's wonderful work I would pick this to demonstrate her attention to detail.

As a freshman I was intimidated by her because she was so busy and possessed knowledge and skills I could not fathom. Over time I found her to be my friend and a source of information and inspiration. She helped me become a better at my craft. She taught me through her example to not rush and slap a project together (although there are times when that is called for) but to work on improving my skills and that speed will come but quality can seldom be added later. Her costumes looked great on the inside as well as the outside. She was about Quality. I really enjoyed working with her.

When I see pictures of my wedding dress (which is daily when I am home) I think of her. I was planning on making my own and she said she would help me with it. I met her in the costume shop and we started sketching. After establishing a vintage feeling silhouette Nina paused and said "let me see what we have." She disappeared into the room of closets and emerged with a vintage lace dress that they have had for years and never used. More amazingly, it fit. Nina made some slight alterations and sold me the dress for $75 (which she used to take the students who worked in the costume shop to the end of the year drama banquet). I would really like to know how many wedding dressing Nina worked over the years, I'm sure the number is astounding.

I am glad to have known her and sad to think that I won't get to continue to know her better. My heart goes out to her family during this time of unexpected loss.

Wednesday, November 17, 2010

Clear Scan #2

Very good news! My thyroid scan went very well. I needed two clear scans in a row and that what we got! So now I am finished with thyroid scans and getting radioactive every six months-- I won't miss that at all... well... playing with the giegercounter was fun, and being called 'hot' and we were able to make a lot of jokes about it... But this is a good thing and six months from now will be much more fun than getting ready for another scan!

Also I never crashed off my hormones like I was told to expect. I caught a cold and so I had a sore throat and a cough which was no fun but nothing like the horror stories I've heard. It got to the point that Dennis decided that apparently I do not need a thyroid and that thyroids are surprisingly optional. Which is fun to joke about (I had thoughts of making a "thyroid optional" t-shirt to wear to my scan) but I feel the need to give credit where credit is due.

Since this is a public blog I will keep it brief. At the beginning of all this, before the surgery, I received a priesthood blessing (it's a very awesome Mormon thing... if you have questions about it let me know and we can talk about it). It was a powerful experience in which I was told that I would be alright and that I would have strength. I truly believe this made the difference, why the doctor would look at my blood work numbers and tell me I should be feeling sick.


I am Grateful.

...and radioactive...

Monday, November 15, 2010

... Before the Break... Part 4 More Work on the Fair Displays

These small figures where for another county display at the fair. This display had several windows with different vignettes.


Sleeping old man with snot-nosed kid. (note all the fun outdoors-ie equipment of all the fun things one might do in that county)


A gold miner (because there used to gold in the county and folks would mine for it). Each of these figures are about 12 inches tall.


For the train conductor I channel Stan Laurel/ Dick van Dyke. Makes a fun face to make.


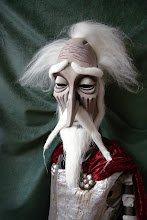
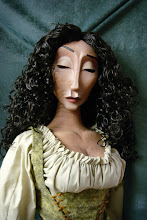
The romantic wine couple are a larger scale. Each head is about six inches tall. If you look closely (or click on the picture) you will notice that the lady had a thyroidectomy scar. After she was sculpted I asked Richard if she could have a scar like me (I may have even mentioned that thyroidectomies are never represented at the fair). He looked at me (perhaps to see if I was serious) then he said okay. I was really surprised at how happy this made me. So when I took the figure to Francine for painting I showed her my scar and she was all for it too. I love the people I work with! It's subtle, just like the real thing.


This one is of a farmer on a tipping ladder. Check out the crazy detail Nina put into the costume-- overall clasps!


This was a quick assignment Richard had me do for another county where we needed two silhouettes inside the tent-- storytime.


The Mark Twain relief and jumbo book were for Calaveras county. I wish I got a good picture of the whole display but none of them turned out. Mark and Dave not only had to design and build a 5' platform that would hold a Jeep (with a pile of props and mechanics) but also design and build a way for the Jeep to get up there. They ended up building a special cradle that would allow a forklift to pick it up but only contact the jack points. That was an exciting day.


It was hard for me to bring myself to replicate the original cover art on the book because... well... it's weird lookin'.


Here is another one of our counties, we do several of them. For me work at the fair goes in several fairly distinct phases. First I carve and sculpt and make things (puppet-type things.. I seem to have a niche for people and animals mostly). When everything for me to make is made (although things to be made can pop up later in the process) I move over to painting. It takes me about a day and a half to change gears and get into the painting groove. Sometimes I paint the things I sculpted sometimes I don't-- we have a very very good crew so I don't feel overly possessive, although when I do have a pretty clear idea of what I would like to see I communicate it (i.e. thyroidectomy scar).

When the painting is winding down the work shifts to placement--setting up the items to be displayed-- often involves pins and hot glue-- sometimes involves artifacts I'm nervous about touching (Richard will often do the really important ones). Placement is like a puzzle. Getting all the items you need to display in a specific space in an aesthetically pleasing way. Sometimes you have too much product with too little space and sometimes you have to make what you have look like more than it is to fill the space you've got. This is also the time when everything starts coming together and starts looking like a fair display. The finishing touches. Then I'm on clean up, dusting and the like, and sometimes some paint touch ups etc.

Those are the main jobs I do. There are many other people doing many other things that get the display ready for judging. It's great to work such a group!

Thursday, November 11, 2010

... Before the Break... Part 3 Work on the Fair Displays

This is the main project I worked on this summer for the California State Fair County Displays. For this display I sculpted all the heads and hands that took about a week of work as I recall. This is the first time I've actually felt fast. I like to think it comes from years of being slow, but paying attentions to what I was doing. I also made the fish, the dog and the instruments (the fiddle took the longest) as well as a tiny little bird that pops up out of the lady's hat and the boat with oar.


Looking at these photos I really miss how the fair used to have theatrical lighting for the fair displays-- it look so much nicer-- but I'm amazed with all the budget cuts that they are still doing the county displays at all so i guess I should just be grateful... and take my photos before everything is in place.


This is how this display looked as a whole. My dear puppetry professor Richard Bay designs them and Mark Baker of Fantasy Builders heads up the carpentry/engineering/ animation. They are great to work with... and I'm not just saying that because they hire me... but I'm glad they do!


Monday, November 1, 2010

... Before the Break... Part 2 my birthday

.


This is the first time I've been home for my birthday for eight years. I must say it was quite nice. Games were played, cake was eaten, fun was had! It really was fun to get to spend some purely fun time with the family. It was even worth the sunburn (my fault for forgetting my hat).


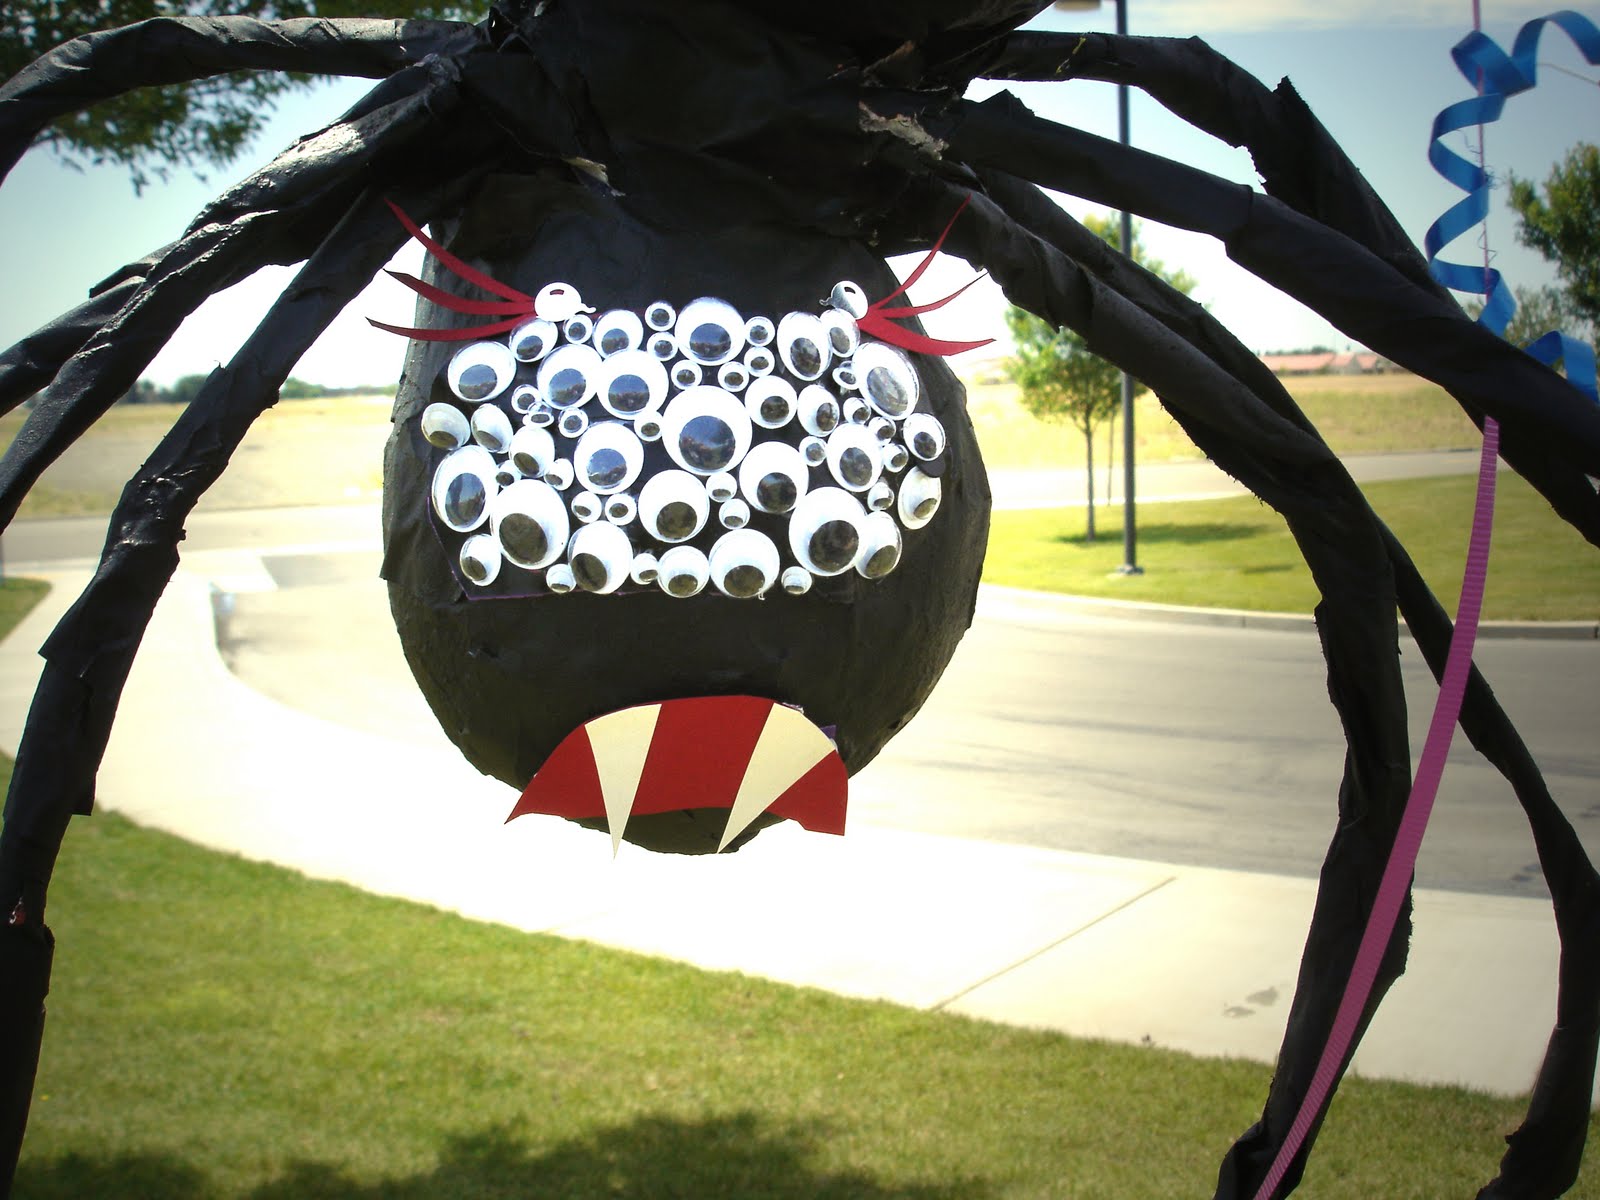
The part I got pictures of (on my camera anyway) was the pinata Jayna made! Really how can I not love this girl!?


Seriously!

She said she chose a spider because she felt responsible for making me afraid of them-- which she totally is! ;P The inside was filled with fun little toys and Reese's peanut butter cups which just so happen to be my favorite... and I'm guessing someone knew that! Thanks everyone for a really fun day that I still look back on and smile!